Saturday, December 28, 2013

Chassis on bike

The chassis is laid on the bike nicely. Certainly not a perfect fit, but will withstand 10 kilos on it with no worries.
Howeva, there's still nothing that prevents it from tilting sideways.


Now there is:

Cushioned up for the batts to truly feel at home.

Programming the controller

The controller's job is to regulate & also monitor (only to a certain degree, though)

My controller of choice is the lyen extreme modder mark II. Along with the controller, I ordered from Lyen a programming cable for it. You can program virtually every aspect of the controller's functionality using the USB-TTL adapter like: max current to be drawn from the battery, max current going to motor, cruise control, speeds, low voltage cut off, and many others.


Friday, December 20, 2013

RC Lipo Charging & Handling

There are numerous guides & tutorials over the web. And now here's mine.


(M) = Mandatory, must. You MUST follow this rule.
(R) = Highly recommended, but not a must.

First & foremost, each RC Lipo "brick" must undergo the following initiation (in order) upon receipt from the seller:
  • (M) Verify the pack isn't swollen. If it is, it's done for, give the pack for recycling.
  • (M) Plug a celllog-8 or equivalent, and see that all cells are at most (+/-)0.1v around a certain voltage, and that that voltage is between 3.8 and 3.85v.
    Example for a 6S pack: 3.84, 3.84, 3.85, 3.85, 3.84, 3.84.
    If one of the cells is off by just 0.1v, the cell may be salvageable by several cycles of balance charge & discharge.
    Example for a 6S pack: 3.80, 3.81, 3.79, 3.80, 3.81, 3.81.
    If after several cycles the cell still exhibits the same values, the pack's no good, throw the pack for recycling.
  • (M) Balance charge the brick to 4.15. The brick is now almost at full capacity within safety limits.
  • (M) Discharge the pack until the first cell reaches 3.0v. If the other cells' voltage is >3.5v, that's a bad sign. Perform several cycles of dis/charge, if the behavior remains, that pack's no good for use.
  • Perform several cycles of dis/charge. If any of the cells exhibits wonky behavior, that pack is to be put aside.
Charging & caring:
  • (M) NEVER EVER have any cell below 3.0v or above 4.2v.
  • (M) Never charge unattended.
  • (R) Charge at 1C maximum.
  • (R) When not in use, keep the battery's balanced voltage @ 3.85v, that's how cells like to be stored and it will lengthen their lives. Charge the cells to 4.2v close to time of use.
  • (M) Discharge cells to no less than 3.5v. Discharge to 3.3v only if must, but keep a close eye because that's when some cells plunge to 0, and.. catch fire or explode.

Sources:
RC Lipo series charging tutorial

The battery pack


So I ordered 20 zippy batteries ("bricks"), and plan to hook them up in a 24s5p pattern.
Each battery is 6s (i.e. 6 cells already hooked in series) to begin with, so I'm gonna make a serial connection between groups of 4 batteries, leaving us with 20/4 = 5 higher voltage batteries. Those I'm gonna connect in parallel, leaving us with a high voltage & high capacity battery. 100v 15Ah = 1332Wh to be exact.


Another schematic demonstrating how the pack is actually wired with one big connector for the controller. This is a serial wiring:


And for the charger, which is PowerLab 6 capable of charging up to 6 cells as its name suggest, we'll parallel all 20 zippies:


Now, that's a looooooot of power. That's enough to carry me 53Kph for 1 hour, or 70Kph for a little less than 1/2 hour (that's the plan anyways).
With a charge time of slightly more than 1 hour, we have acquired quite decent mobility.

I chose the Lithium-Polymer chemistry because it explodes and goes out in flames if treated wrong stocks so much power for such a low weight & price. Please read all you can about LiPo before getting into the business.

All 20 zippy's weigh ~9.5Kg.


Monday, December 16, 2013

Charger

I bought the Revolectrix PowerLab 6, highly reputable across the web, considered the rolls royce of chargers no less.

And I found it to be so, in fact. It checks everything so that any mistake on the user's part is simply met with a descriptive error on the screen, and no damage is done. It even recognizes when the power supply (the input) is running out of power (like when using a battery) and draws less and less.

There's only one gotcha - the balance connector they use is JST-PA, a different one than what is the de-facto standard - JST-XH. So poop on them for choosing that road rather than aligning with the crowd.

Anyways, reluctant to wait several weeks for a proper adapter to arrive in the mail, I chose the ghetto way, and soldered a JST-XH plug's wires directly, in FMA-style wiring, where the positive is on one end and the negative(s) on the other.


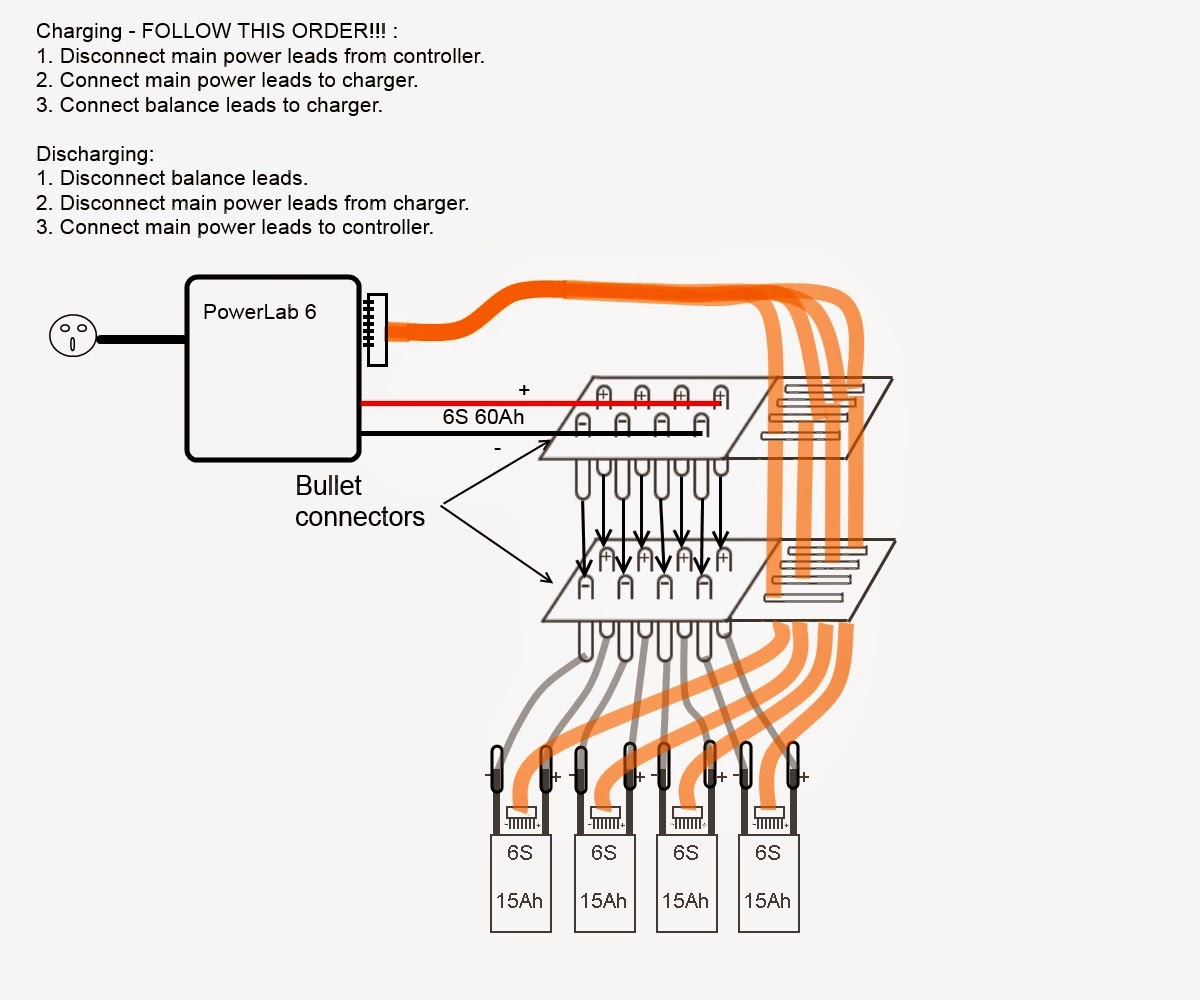
I proceeded to connect the battery:

Alright!! The charger sees the pack!

And then the new contacts started smoking... :( Indeed that was poor soldering at start.
Luckily, nothing was damaged, not the charger nor the power supply and not the battery or its wires. Only the soldered wires fried and stuck to eachother.


So, with a fresh & proper soldering this time, I started the charge-discharge cycles, talked about in the next post.

To save considerable time, I charged one battery while discharging another by using that as the power source.

Tuesday, December 10, 2013

Chassis for battery pack

After giving it more consideration it seems like the more preferable solution is to have the entire battery pack at one location, so it is easily detached from the frame for charging.

For that I made a "chassis" where all the bricks are gonna sit snugly next to each other,
and mount the whole thing on the top tube, like a fuel tank with motorcycles.
I bought some flat bars, adjusted their lengths with an angle grinder, and used DevCon S31 2 Ton Epoxy with 2500 psi (advertised, should be enough anyways) to glue the pieces. (Note that one piece hasn't been glued yet).


I then dropped the glued bars to the floor, and snap they go! Everything back to pieces. The 2-ton caved like nothing :( it fell from no higher than 70cm.
I think I did everything right - sand-papered the surface then wiped it with acetone before applying and let it cure for 10 hours. In fact, even several days later I was able to peel the residues off with a player, so it's not that strong after all.
 So me and tony 2-ton will go our separate ways, and I'll bolt the bars like I should have from the start.


Saturday, December 7, 2013

Rim, tire, wheel building...

I went with Ilia@EbikesSF's recommendation and ordered Velocity Blunt 35 26" rim with 12ga (2.67mm) spokes (made by Phil Wood) for a Maxxis HookWorm 2.5.

Using this very simple guide I built the wheel to 99% trueness, 'nuff for me at the moment.


1-cross lacing pattern is about as best as you can get with such a wide hub, spokes are stretched enough.

The axle fits in the dropout perfectly without the need to file - one of the benefits of a DH frame.


Wednesday, December 4, 2013

Stuffs!

Lotta stuff started pouring in...

We have:
  • Lyen controller, extreme modder Mark II (highly recommended supplier of high quality electronics).
  • Grin Tech's Cycle Analyst v3.
  • Full throttle.
  • Hobbyking LiPo Battery Medic.
  • 3-Way speed switch.
  • Cruise-control switch.
  • 21 Zippy's.

Thursday, November 28, 2013

Motor

Motor has arrived!


This is the new H4040 model, rated at 3.5kW continuous. Bought from Ilia @ EbikesSF.com - buy from this guy, seriously, the quality of his service is unparalleled.

And she's a big gal...

With 64mm outer shell width, there's lots of room for 4-5 kilowatts to live happily together.

A  185mm disc doesn't really cover it, with outer diameter being ~243mm.


Wires:
3 Anderson Power Pole phase connectors.
5 Hall sensors.
1 Temperature probe

Spoke holes take 12ga spokes snugly.


Monday, November 18, 2013

Batteries, revisited

Well, maybe not.. Looks like the turnigy 5Ah is backordered and I don't know when it'll be back in stock, so I'm going with the ZIPPY Flightmax 3000mAh 6S 20C.
Characteristics:
Capacity(mAh)       3000
Config(s)           6
Discharge(c)        20
Weight(g)           426
Max Charge Rate (C) 2
Length-A(mm)        111
Height-B(mm)        47
Width-C(mm)         43


That means I'll need 20 bricks instead of just 12.
The downside is having more connectors and soldering to do, but on the upside it's a smaller brick meaning a better fit inside the triangle.

I thought about placing the batteries in bags like so:


And without the annoying text we get something roughly elegant:


Saturday, November 9, 2013

Batteries


My battery of choice is the Turnigy 5000mAh 6S 20C  from HobbyKing.com.
12 bricks of this one in a 4S3P pattern make up a total of 88.8v 15Ah = 1332Wh.

Trying several positioning patterns, I'm settled on this:


The Lithium-Polymer chemistry is wonderful. It provides a lot of watts in a little package that is able to deliver a lot of amps. But it's also unforgiving when certain rules are not tightly observed. Essential material to get to know by heart with before having anything to do with this battery:
Understanding RC LiPo Batteries
Complete Guide to Lithium Polymer Batteries and LiPo Failure Reports
Lithium Polymer Battery
Parallel LiPo Charging – The Faster & Safer Way To Charge?
How-To: Parallel Charging

Thursday, November 7, 2013

Behemoth

Here's the Demo (you can have a looksy at the specs here: http://www.specialized.com/us/en/bikes/archive/2008/demo/demo8#specs).
Decision based on MadRhino’s (from endless-sphere.com) previous experience with converting this bike to something really magnificent.

Got it for a bargain @ 1130$, and the nice seller threw in a full-face helmet for free. Yay!


It's a real beast, built to sustain the most difficult of mountain riding. But will it handle the amps? I think so.

The old ride


This is what I've riding on, on a daily basis, 30KM each way to my workplace and back.
Specs:
  • Bike: Gary Fisher Big Sur XC 2006.
  • Motor: Bafang 350W Front (runs at 500w after controller's shunt was soldered).
  • Battery: 36v 16Ah (two 36v 8Ah in parallel).
  • Controller: Some 6-FET garbage..
  • Watt Meter: Cheap yet fully functional meter from eBay.
  • Custom torque arms after original failed.

Handling: 40KM/h max, 50KM range.

I've learned so much from tinkering with this setup and customizing wherever I can.
This bike as it is has probably got 18,000 KM on it, and except for low squeaks that the motor's been doing for a long time, it's otherwise still going very strong.
Batteries have undergone 620 charge cycles and show no sign of fatigue, combined voltage hot off the charger is 42v. But how long can you go on with just 40KM/h..?

Prolog, the plan, and some recap

Cut to the chase:  Finale

In this blog I aim to document the building process of my second electric bike.

Disclaimer: This setup is quite powerful, and therefore FORBIDDEN by law to ride on road, it is meant for off-road use only. This blog exists for demonstration purposes alone and anything you do is on your own bloody responsibility, bla bla bla...

My objective: A high-end bike (DH frame), with a decent & reliable system that can deliver 40-60 KM/h, with short periods (like 2 minutes) of ~70KM/h. Most of the time I'll be cruising ~45KM/h, but I'll want that 70 for whenever I have an option to ride that fast.
My terrain is mostly flat. I plan to use the bicycle as my primary vehicle to work & back. Each way is ~30KM and I can charge at each end.

The following recipe fits that bill (and then some):
  • Bike: Downhill/Freeride bike with space in the triangle.
  • Motor: Crystalyte H40 Cruiser from Ilia @ebikessf.
  • Battery pack: 24S 15Ah of Lithium Polymer high discharge (5C).
  • Controller: LYEN Edition 12 FET 4110 MOSFET Extreme Modder Controller.
  • Charger: Cellpro Power Lab 6, 1000w.
  • Power supply: Some 1000w power supply...
  • 3-speed switch, cruise control, multi switch (for lights and bike's on/off), battery alarms.
  • Cycle Analyst V3 (with the temp control).
  • Wires, connectors, solder, lots of good tools.
This kind of setup should give 44KM of range @ 50KM/h, and an amazing climbing ability even for tough hills, with a maximum of 135nM of torque. The controller will transfer a peak of 5kW to the motor. Not bad :)


Before beginning, a small recap:
  • About half a year of research on motors, batteries, etc., focusing on what I really want, researching more ... Started with a 1000w motor in mind, then thought that two 1000w motors would be even better, and finally went back to just one motor that's more powerful than the previous two together - 3.5kW continuous. All in all hundreds of hours' worth of reading. The best read of all is www.endless-sphere.com, THE place for electric vehicles.
  • 22/10/2013 - Decided on the Crystalyte H3540 motor from www.ebikessf.com (highly recommended). But found that it's back-ordered, so went for the yet beefier & more powerful 4040 :
  • 06/11/2013 - Settled on a used 2008 Specialized Demo 8 as base. Decision based on MadRhino's (from the endless-sphere) very successful experience with converting this bike.